| TEE SHIRT ART
We like "finished" art to be in a VECTOR format. Some examples of VECTOR art are files created in Adobe Illustrator (.ai), Macromedia FreeHand (.fhx) or Corel Draw (.cdr) or most files that have an EPS (.eps) file extension.
Files created in Adobe Photoshop are not VECTOR format but rather BIT MAPPED or RASTER images. TIF (.tif), JPEG (.jpg), Ping (.png) are not "finished" files and often must be re-created in a vector format to be useable. We are experts at recreating those images but if you already have them in the optimal format you will save money.
We have the ability and expertise to render your tee shirt art in the proper format whether you understand the file system or not... but read on if you want a quick education on the subject.
VECTOR format means that the graphics program is creating a mathematical formula to redraw the art inside the computer. The art is redrawn based on this formula and it is smart enough to know what the maximum resolution of the device is. Sometimes that is a comptuter screen, sometimes a printer, sometimes a web page or sometimes a piece of paper. The program matches the final size to the final resolution and the result is art that, regardless of how big it is expanded or how small it is reduced inside the computer, is always as good as it can be.
In RASTER or BIT MAPPED art those decisions have already been made and they are final. A BIT MAP already has it's final size determined and expanding it just makes it blurry while reducing it throws away some of the information. It is only its best at its ORIGINAL size (and that may not be the size you need!).
VECTOR art (in a VECTOR program) can easily be separated into colors and can just as easily be recolorized when your budget calls for less colors to be printed on shirts. Geometrical objects are the mainstay of VECTOR art so crisp, clean lines are easilty achieved and easily maintained. WE have the ability to transform almost any kind of image into a VECTOR image (where it can more easily be manipulated in a VECTOR program). This process can be time consuming and will add to the final cost of your project.
|
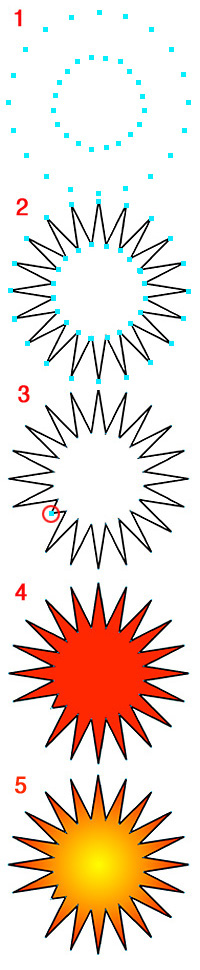
| The starburst at right is stored in the computer as a set of junctions that lines are drawn between, like the connect-the-dots that kids find in coloring books (1). |
 |
|
| The computer then draws the lines between the dots, or boxes (2). |
|
|
| If we move the control points the computer redraws the shape (3). |
|
|
| We can FILL the shape with any color (4) and choose any color as the outline or STROKE (here it is a black line). |
|
|
| The computer can create a GRADIENT FILL (5 - yellow to red) and render that fill perfectly. When we are done the computer can then SEPARATE the shape into 2 colors (red and black as in No.4) or 3 colors (red, yellow and black as in No.5). |
|
|
|
|